100mm spacings, what does it mean?
It is a very simple answer, every upright bar is spaced with a 100mm gap between it and the previous upright bar. It is as obvious as that. You will see it on a lot of websites selling wrought ironwork. 100mm spaced or 100mm gap between bars. But there is a bit more to than just that, some hidden details that you should be aware of.
Perhaps one of its great strength is that you can buy mass produced parts, all designed to fit in a 100mm gap. Scrolls, rings and a few weird looking things. Because they are mass produced in a factory, they are far cheaper than you could ever hope to make by hand. It gives access to a source of cheap components to weld into a gate or railing. Allowing the cost savings to be passed onto the customer.
It also allows you to make a “jig” to aid in assembly of the gate or railing, because every gate or rail has bar spaced at 100mm. No need for marking out and working out spacings. Just drop the bars into pre-set slots and weld up. This is obviously much quicker . Again less time to build means it is cheaper.
There is a down side to 100mm spaced. The end bars in the railing may not have same gap as all the rest. because the end gap for the last bar and the end of the railing or gate, is what is left over. As per example below.
But if you are happy with that and understand how it works. you don’t need to read the rest. If you want a greater understanding of bar spacings then please read on, as an alternative method is explained.
This is a list of connected pages. to make best sense of this i would read them in the following order.
you are currently here.
Spacing V Centres
Before I can explain another method, there is something i need to explain that is common to both methods, when working out spacings.
I talk about gaps between bars. But what i really mean is the centre position of the bar relevant to the previous bar. That sounds more complicated than it is. let me explain better.
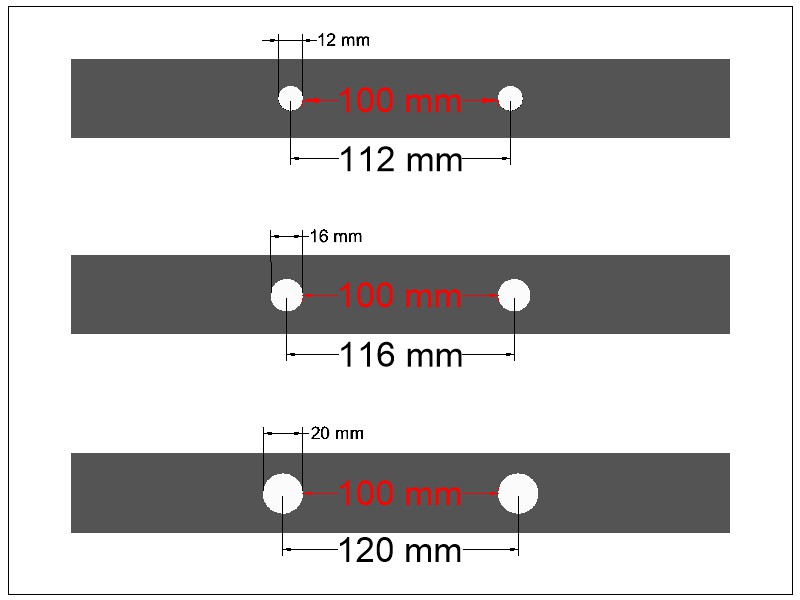
In order to get a 100mm gap between bars, i have to know the thickness of the upright bar you are using. If the bar is 12mm thick then you need to mark the bar centre positions. Which is 112mm from the next bar. If it is 16mm then it needs to be 116mm apart etc.
The drawing helps explain perhaps better than i can in words.
But a point to note with both methods, if you work it out based on using 12mm, then change your mind and decide 16mm is better. It will change the positions on your bar for marking. because of the increase centre positions on 16mm, it could mean you have a smaller number of upright bars.
The other method.
The other method or non fixed method of spacing is more complexed and requires some basic maths. This makes construction a lot slower than the 100mm method. Feel free to bypass the maths, but it does help explain it. The short version is you aim for a maximum gap size but usually achieve a smaller gap size. The distance from the wall to the first upright bar is the same as the distance between all the other bars. All nice and even, looks great but time consuming to do.
Take the length require of the railing. lets say 1200mm for the purpose of an example. Because you are working from centre positions of the bar. you need to add the thickness of the bar to your railing length. This might seem strange but look at the drawing below.

The red circles are where imaginary bars should be, if you want the perfect gap. Using 12mm thick uprights, the centre of that upright would be half the thickness of the upright bar at each end. This might seem strange but this ensures that the gap from the end of the bar to the first upright bar is the same as the gap between all the rest of the bars. Remember we use centres of each bar, so the centre point for a 12mm bar would be 6mm off the end of the bar.
Now we have a imaginary length of 1212mm. what we are looking for is a gap between bars of 100mm. As we use centre position of the bars, we need to divide by 112mm. 1212 divided by 112 is 10.82…. What we were looking for here was a whole number with no decimal places.
If we round that 10.82 up to 11 and now divided 1212 by 11, we get 110.2mm centres (near enough) or a gap between bars of 98.2mm. That’s close to 100mm but it might exclude us from using some pre-made parts because they wont fit the gap, now you have the bar centres you can mark out the positions where all the uprights need welding. But you have to hold them in place and tack weld into position before fully welding, just make to sure you made no mistakes. Its time consuming and often excludes you from using pre-made parts like scrolls. But what you get is perfect spacing, along the whole railing.
Now i know that dividing 11, means i didn’t get a centre bar. A centre bar might be all important to the design for this railing. I could correct that instead of dividing by 11, i could divide by 12. what i get is 101 centres, which means a gap between bars of 89mm. If ever you had a chance of squeezing in pre-made parts before, that has now gone. But you do have that all important centre bar to work my design from. Of course there is a down side, as with everything.
You don’t exclude yourself from all the pre-made parts just the ones designed to fit in a 100mm gap. Twists and baskets etc are still on the menu. If you have two panels next to each other that are different lengths. it may be noticeable that they have different bar gaps to each other. Making a jig to aid in assembly is difficult, because the spacing change from size to size.
The Cons of 100mm spacing.
Now I never fully explained the cons of 100mm spacing. I left that for last until i had it explained the other method. because the answers are partly there.
We said above a perfect size would have been 1220mm, but we have a size of 1200mm. What this means on the fixed space 100mm gaps, is the end bar is going to be 90mm gap between the wall and the first upright. And 90mm between the final upright and wall. But the rest of the uprights will be 100mm gap. We lost that nice even perfectly spaced look. Its only 10mm no one will notice.
But if the railing length required was 1150mm instead of 1200mm. We are now 35mm short of that 100mm gap each end. The gap between the end bar and wall is 65mm That is far more noticeable. The question is it a bad look? i will leave that for you to decide.
I mentioned a centre bar before for the purpose of design. But we know the fixed gap railing has 10 uprights so no centre bar. Can one be forced?
It could be forced but it is going to make that end bar even closer to the wall. Squeezing an extra bar in will really close the gap on the end. instead of 10mm off based on the 1200mm railing. its going to be 34mm gap at the end from bar to wall. The standard simple adjustable wall brackets are going to foul on the end bar because there is not enough space. A drastically modified one will need to be made. but it could be done with extra time spent making modified wall brackets.
So now you can see the Cons with the fixed space. The size i choose was just a number plucked out of the air, but it was a good example to show how it could go wrong. it really does depend on the size of railing you need.
Conclusion.
Both methods of spacing have draw backs. The fixed spacing has cost and speed of construction on its side with a mass of usable premade parts available. Allowing for some nice designs, whilst keeping the cost down. But can have issues with the end bar space. It is far more predictable in terms of cost, allowing a simpler price list to be used, where plain bars can be swapped out for decorative bars. Because you are using pre-made parts, you know the cost of the parts and the time required for assembly.
The other method of spacing is far more time consuming to produce, negates the use of some of those cheap mass produced parts. Meaning expensive one off pieces need to be made. Spacing on bars is always even. It near impossible to create an price list, due to possibly needing one off parts, for bar construction. So it becomes common place to exclude those parts like scrolls and rings which need the correct gap between bars. This results in a limited number of designs.
Notes
Previously I was always in favour of the non fixed method of spacing, using premade parts where possible. When not possible making my own. Sometimes it possible to use premade parts and adapt them. Its easy enough to “clip” a few millimetres out of a 100mm ring, to shrink it down to 98mm. beyond that you have to form your own. This usually means making a tool to do it. Time spent making the tool and then time spent making the part with the tool. All the time when you are trying to compete in price, with companies using fixed space method. Who you know are spending 30% less time making something that you are. Because of the speed difference in using fixed space. But you are trying to match the price which is near impossible.
Pricing becomes more difficult, using a premade 100mm ring is quick. Getting a 100mm ring cutting a small section out, tapping it into shape to reduce its size takes longer. Making your own ring takes even longer. You don’t know what you need to do until you have the exact size of the railing, because you don’t know the gap between the bars. What you really want is something predictable, at least so the customer can work it out for themselves, or get a close estimate of what it costs.
I am not talking plain railings here, but those with detail or a design in. What you end up doing is offering a few choices of designs, where you know it doesn’t rely on needing a 100mm gap. Because you always resisted using that method. It is only when you take a step back and look at the plus points of 100mm spacing. you realise it has a lot of plus points. You can offer the customer massive choice of designs. every design for every size can have an accurate price. But in order to do that, you need to spend time, explaining things. Along with giving a basic education in design, which should allow them to design something they will truly like.