Basics of design for gates and railings.
No reason why you can’t design your own gate or railing, have something truly individual. Not as expensive as you think. Following some basic rules of design will keep the price down and make designing your own individual piece easier than you think. This is a guide to help you design your own.
All these design instructions are based on using 100mm gaps between uprights. This allows for the use of pre-made parts. Thus keeping costs down. But you are doing some of the hard work yourself, and that is the design. But you know what you like and dislike. So it should be easy to come up with a design you like. Gates, Railings, Juliet balconies etc share a lot of the same principles but they also have there own individual specific design needs or requirements. We get into the individual requirements a little latter.
Gates, railings, Juliet balconies are all based on have a top horizontal bar and a bottom horizontal bar, with infill upright bars (creating a ladder). Gates have an outer side bar, or a hanging and closing stile. But they still have those vertical infill bars. Its those vertical bars that help create design patterns. Those design patterns are what can make your gate or railing individual or at least different to what everyone else in the street has.
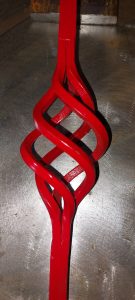

There are two basic types of detail or design. Either detail created within the bar. such as a basket. Which is welded between two short bars to create a longer bar the required length. The individual bar being the detail.
Or detail created within the gap between bars like a pair of scrolls. These are welded into the space or gap between upright bars, to give a design or pattern.
Its how you use and place those parts that make a pattern or design. That will help you create something individual. A design you really like rather than an off the shelf design which sort of looks ok.
Size is everything.
One of the things to take into consideration is the longer something is, the more upright bars are required. A 900mm long railing isn’t going to contain the same number of upright bars as an 1800mm long railing. Whilst this might seem the most obvious statement in the world. The number of upright bars has an effect on the design. Again perhaps stating the obvious.
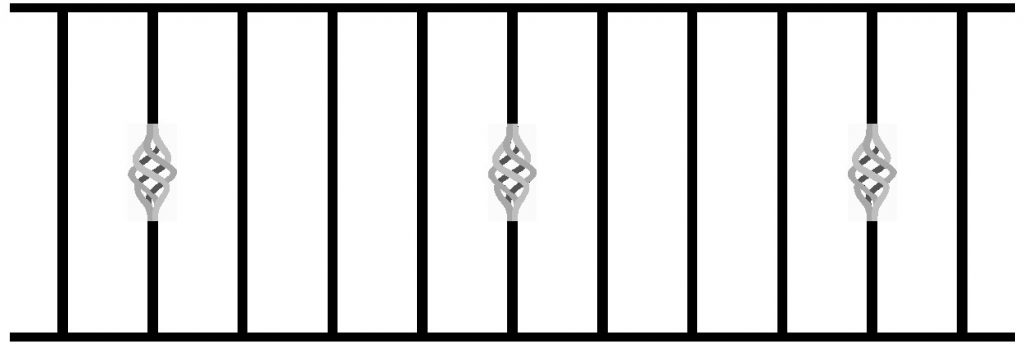
The examples here, 3 baskets spaced at every 4th bar in a railing.
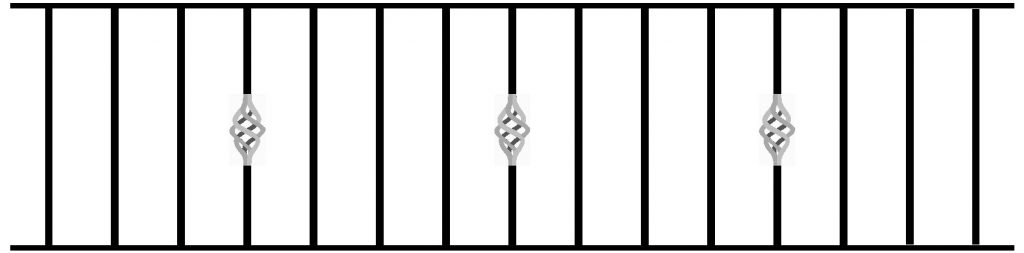
Here starts one of the problems, with custom made. The two don’t look the same, which is very obvious as the difference in upright bar numbers means it can’t look the same. We are talking about the placement of the pattern or design. The question is if you had seen a drawing of the larger railing, at 1700mm long (right drawing). On a website with a buy now price for a 1250mm railing, which is the size you need. Would you be disappointed with what you received (left drawing).
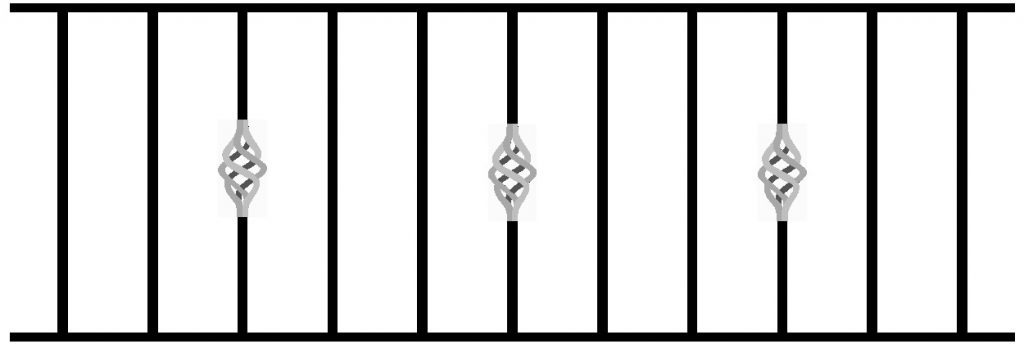
Should the railing have turned up perhaps looking like this instead with the bars spaced every 3rd bar instead of every 4th one. To make it look more even?
Perhaps at the very least they should have sent you a drawing with the two options to let you decide. Now this is where the cost starts to climb. A drawing takes time to do. it needs to be emailed to the customer. Wait for a response, maybe adjust the drawing, resend etc. It become very easy for an hour or maybe two to be lost with drawings and customer contact.
But it only takes 2 hours to make the railing. So now that railing that takes 2 hours to make has cost 4 hours work. so you charge more for custom made to cover the lost time. That is unless you can explain it to people. In short that is the purpose of this section of the website. We share the work load, you do the design and understand exactly what you are getting. I do the making. You only pay me for the time to make not the time for design.
So bear in mind what can happen. To help out with this each section, gates, railings, Juliet balconies etc have their own drawings with examples. So you can work out the bar count for a given size of panel. At this point it is perhaps best to choose what you are specifically interested in. So as to guide you though the process.
I would strongly recommend reading the 100mm gap page as this explains a few things that will make it easier on the journey.