Garden gates
When i say garden gate, what i am referring to is a gate about 3ft wide and 3ft or maybe 4ft tall. Taller gates 4ft and above i referrer to as side gates
Where to start, a gate is normally a rectangular frame with upright bars in it. Of course there are alternative options, it would not be much of a tutorial in designing your own gate if i didn’t show a few of the possible options available.
The frame
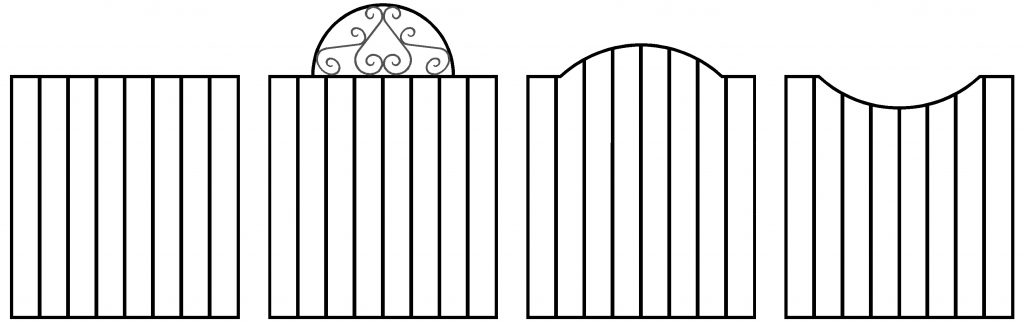
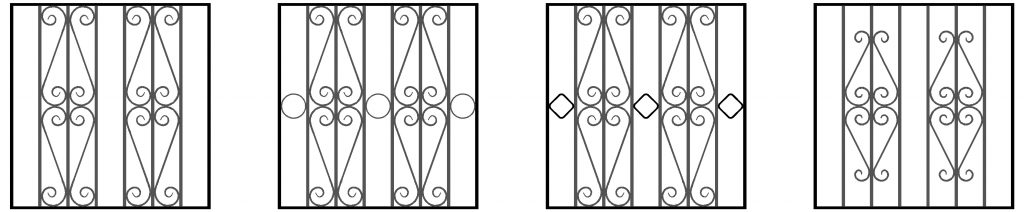
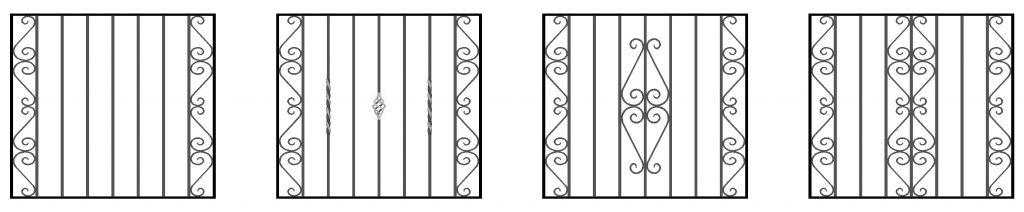
The left most image is perhaps the most common, the standard rectangular frame. no detail or design on the top but we will get into those further down the page. The second one, i couldn’t decide if, it was just top decoration or a frame. It made it into the frame category. This is nothing more than a half circle 250mm or 300mm tall, allowing the use of standard scrolls to form a pattern. The half circle is made from the same size steel as the frame is made from.
The third and fourth are the same. When i say the same what they are is a curve that falls short of the full width of the frame, to make up the width to flat piece of steel are welded on. This gives what I call a shoulder. The obvious difference is that they are “flipped” one pointing up to give a rise in the gate and the other pointing down to give a dip in the gate.
There are of course other options, but these are the more simple ones, that can be produced relatively easily and cheaply. You have to decide which one you prefer
Top decoration
The second drawing is its own top decoration, after it is just a rectangular frame. With a half circle on top. it doesn’t really leave much room to do anything else. The third and the forth one are only really suitable to either leave plain or use decorative railing heads. As decorative railing heads are common to gates and railings, i will have those on their own reference page. So that just leaves the plain rectangular frame to deal with

Left is the standard rail head top decoration, middle is a pair of scrolls with a ring in the middle and the right is just a pair of scrolls. any of these 3 are simple to make and can be used as a top decoration on a rectangular frame.
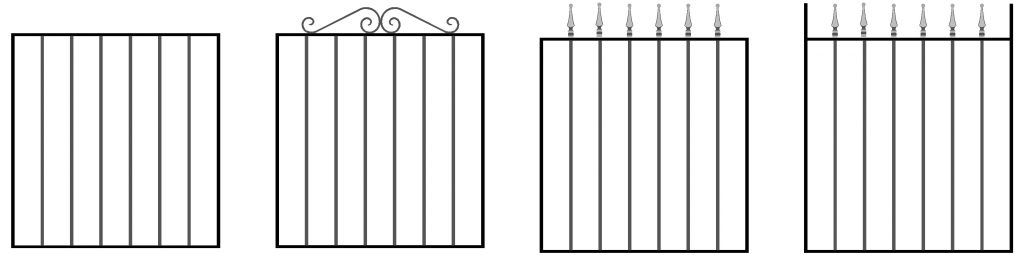
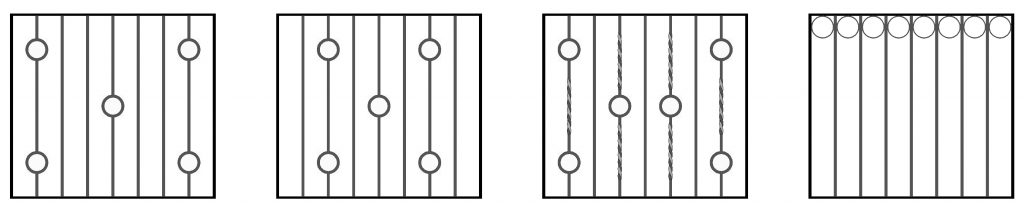
A plain top gate with no decoration, a pair of scrolls, railing heads. Now the last drawing is railing heads same as the third. when you have close to a full gap between last bar and frame. I always fell the third drawing looks lost. feels like it should have something at the end. This is just a very simple solution to that, extend the frame vertical bars so they match the height of the railing heads.
A few paragraphs of text and a couple of drawings, isn’t doing top decoration justice. There is way more that can be done. If it is using premade parts then it is certainly quantifiable, in terms of cost. So it does deserve its own page, and it will get it eventually.
Inside the frame.
Before we get into bar decoration, we need to look inside the outer frame and decide if you want to do something a little different.

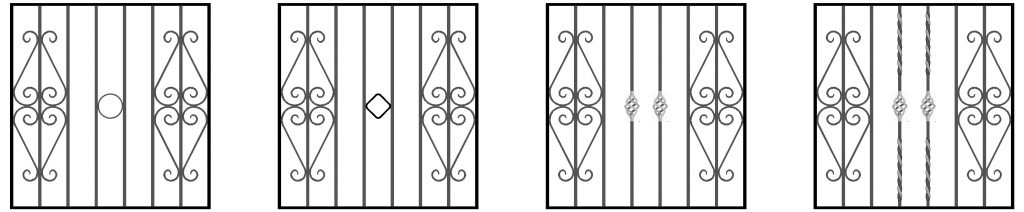
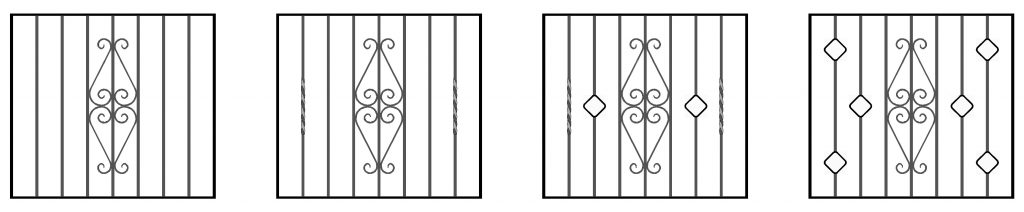
Starting from the left: A secondary horizontal bar is welded 100mm from the top, the vertical bars can either stop at the secondary horizontal bar or pass through them continuing to the outer frame. This now creates a gap. That gap can now be infilled with a designs. It could be laser cut steel letters to spell out a house name or just a number of the house. What ever takes your fancy that you can fit in the gap.
The second one is just the first but upside down. The third is a gap at top and a gap at bottom. The fourth is setting a gap through the centre of the gate to fill with a design, The fifth has all three options, top, middle and bottom. The last is just a plain bar set through the middle, this is common place in taller gates to add strength but can be used in shorter ones if required.
Just to point out, the top gap can be done to follow the rise frame and the dip frame, but this is more time consuming than a flat bar. Of course the middle or bottom bars are just flat bar so easy to do.
I don’t want to get into any real detail on how to fill the gaps on this page, because this is something that is common to all types of gate. It deserves its own page. (not yet available)
Technical details
At some point this has to be added to the page and here is as good a place as any.
It is usual to leave at least 50mm ground clearance under the gate. More may be required if the gate opens on to an upward slope. Railing heads are usually about 130mm tall, but this does depend on the type used. Scrolls are only 100mm tall. So what ever the finished height you want the gate, you need to allow either 150mm for clearance and Scrolls or roughly 180mm for railhead and clearance. So a 900mm tall gate when hung, with railing heads would have a frame height of 720mm (900-180) or 750mm if using scrolls as top decoration. This is obviously important because you need to know the vertical space you have to work with to decide what parts can be fitted.
When it comes to width the minimum the hinge size set up is 60mm wide. but this is with the hinges adjusted full in. on the catch side it is about 25mm. overall it is usual to allow around 110mm. This allows adjustment on the hinges. So a 915mm opening is going to be about an 805mm wide frame. Whilst it would be easy from a construction point to use fixed hinges. Adjustable ones are far superior, allowing a gate to hang upright even when the wall it is fixed to isn’t level.
Perfect sizes
Because we are using a fixed space upright bars. There is such things as perfect sizes, this is where the game frame is a size where the gap between the last bar and the frame end up being 100mm. The same as all the other upright bars. This obviously useful to know if you are starting from a blank canvas and having a gap left in a wall to fit a gate.
Those sizes are listed in the table below, sizes are +/- 25mm when using the adjustable hinges
| Opening size | Frame size | Upright bar count |
| 790mm | 680mm | 5 |
| 900mm | 790mm | 6 |
| 1010mm | 900mm | 7 |
| 1120mm | 1010mm | 8 |
| 1230mm | 1120mm | 9 |
There is a sort of way to cheat and add 40 mm to the size. Gates as standard are usually made from 30mm x 8mm thick flat. So a gate with 5 uprights, will have 6 gaps. if you are using 12mm uprights. 5 x 12 is 60, 6 gaps at 100 is 600. So the internal size of the frame is 660mm. Then you have the 8 mm flat upright each side adding 16mm to the final external dimensions of the frame. Giving a total size of 678mm.
If you were to change the size of the vertical uprights, to 30mm hollow square box, the internal frame size of 660mm plus 2 pieces of 30mm box would give a frame size of 720mm, adding on the hinge gap would bring the finished size to 830mm. Price wise 30mm box is very close to 30mm x 8mm, so it doesn’t really change the gate price.
Of course if the gate isn’t the prefect size this means the outer bars will be closer to the frame than 100mm. The same would apply to those sizes without a centre bar, when you attempted to force one. That’s the sizes with an even number of bars.
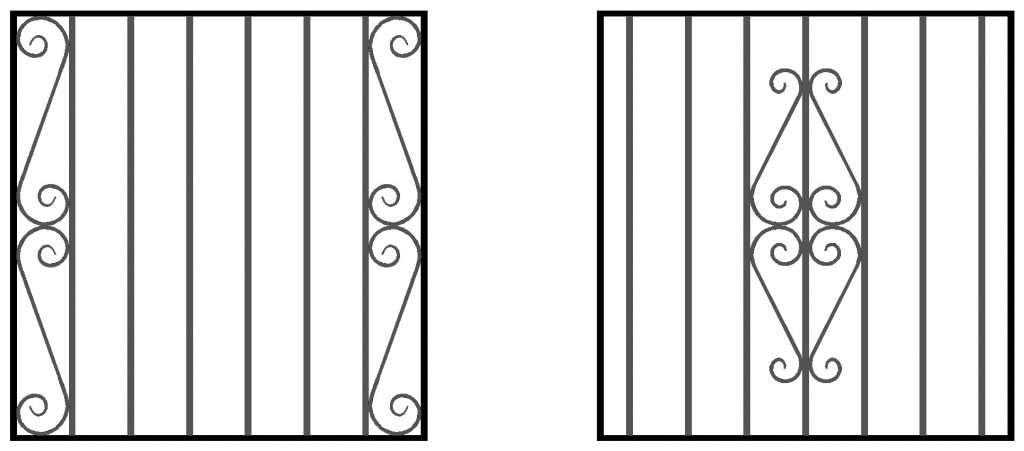
An 790mm frame designed for a 910mm opening. left 6 upright bars, meaning no centre bar. Not the end of the world. The right a centre bar is forced into an 800mm frame. meaning the outer bars are now much closer to the frame. This may exclude the ability to have detail in the outer bars. A twist would obviously fit, but scrolls as per the left drawing won’t fit.
A centre is not a must, you can have some nice designs. with the need for a centre bar
Populating the gate.
So now we can finally get down to putting a design in a gate. As we know the wider the gate the more uprights we have. The height you want the gate will also be a factor, as some parts might not fit in.
for 900mm wide opening, with no centre bar
These are all for a 900mm ish opening, there is no centre bar to work from, and are drawn for a gate of a final height of 1000mm tall when hung.
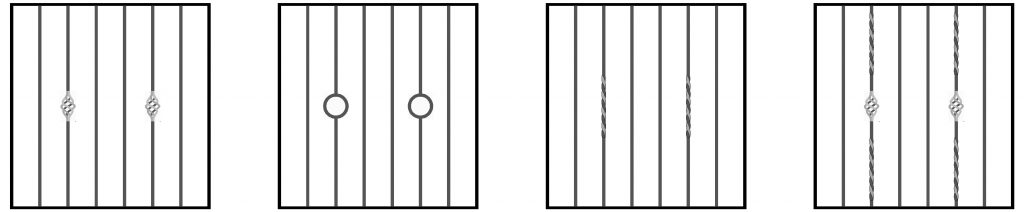
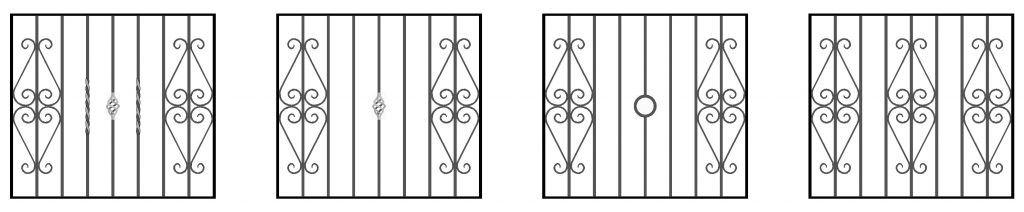
If you want to keep it simple, then the answer is a decorative bar on the 2nd and 5th upright. Depending on choice of bar this wont increase the cost dramatically over the base cost of the gate. If you have minimal tastes then this will possibly be enough to satisfy those.
Sticking with 2nd and 5th bar placement, scrolls are always an option. The larger two headed scrolls are 400mm long, so this would have to suit a gate of around 1 mtr tall. Of course you have the option to use the smaller Head and tall scrolls to reduce height if needed or just use them for the look. Space filling parts can also be used as shown. where you position them is up to you. The examples only have one per gap, but you can put in as many as you like.
Staying with Scrolls but on the first and last bar, obviously to achieve this the gap between frame and bar must be 100mm so it has to be one of those perfect sizes. first two examples use a filler item in the centre, the other two decorative bars. But it could easily be a combination of both. depending on the upright bars chosen
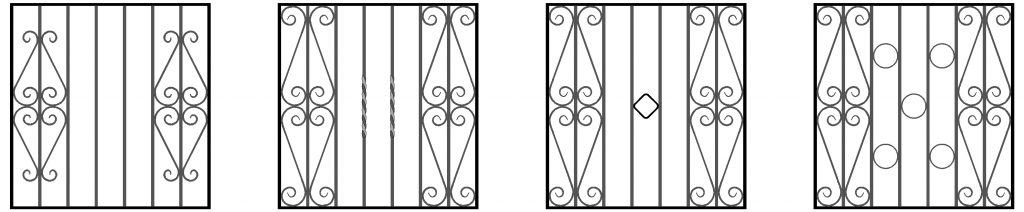
More examples using the larger double headed scroll, except of course the first one which is just plain and uses smaller scrolls

Dominos any one, not the pizza, but the game. But just proving the point that you can use gap fillers to create a pattern. circles used in these examples but it really could have been anything, and it could have been a mix of items.
forcing a centre bar
As said if the gate would normally be an even number of bars, it can be possible to force a centre bar at the expense of the gap at the side. This will depend on the width of the gate.
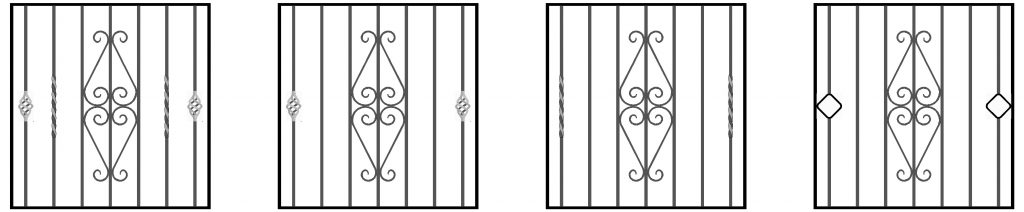
A few examples here, just to point out there could be issues with what you put in the fist and last bar, a Square just fits in the last drawing. but no chance of a pair of scrolls. The following drawings are for a 1mtr wide gate, which does contain a centre bar. if choose the option above and force a centre bar, look below for examples.
1mtr wide with centre bar
With more width the option start to increase, these are few examples.
Of course these are just examples, what you decide to do with your own gate is up to you. There are hundreds of possibilities in the bars section.